Abstract: The document is an attempt at defining the concept behind the Pencil project. It is designed to serve as a reference and guideline for contributors of the Pencil project. I will revise it as it becomes necessary during the evolution of the project and following discussions with contributors and users of Pencil. It is currently based on my original vision and discussions with Oluseyi Sonaiya and Ian Moore.
1. Introduction: some history
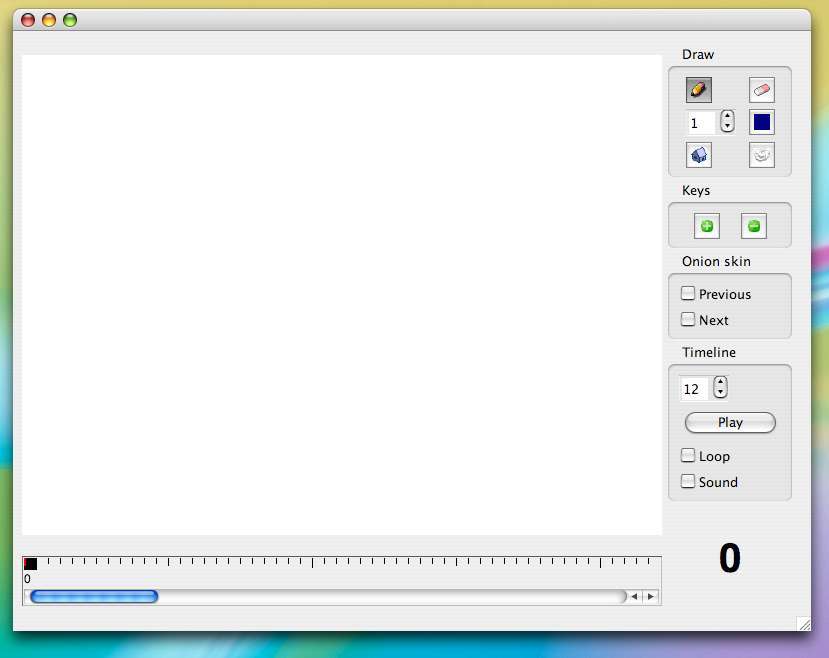
Pencil was originally an application created by Patrick Corrieri by the end of 2005 under the name “Pencil Planner”. It was a simple yet effective pencil test (a.k.a. line test) programme. It included a drawing area, a single-track timeline where keyframes could be added, previous and next onion skins. The drawing tools were a pencil and an eraser, along with a colour chooser. The animation could be played at a specified frame rate, and in addition it was possible to add a background image and a background sound. It was developed under Qt 3 and made available on Macintosh and then Windows platforms under GPL license. The Mac version could output QuickTime files. There were two releases v0.1 and v0.2. This is a screenshot of v0.2:
When I became aware of this programme, I realised that it could be evolved into an application for making traditional animations rather than just pencil tests. Obviously what was needed was more drawing tools to fill shapes with colours, and some selection tools to move things around. I got in touch with Patrick, and started implementing those functions, along with cleaning the original code.
I also implemented tablet support. This became v0.3 of Pencil, released in October 2006. Pleased with the result, I went on with more ambitious goals. On the one hand, the basics of traditional animation is to sketch pencil tests, and then draw clean images on top of those sketches.
Another fundamental of traditional animation is to be able to organise separate elements (background, character, or parts of it) into different superimposed layers. This definitely called for the possibility of superimposing layers. On the other hand, I also convinced myself that vector graphics rather than raster (bitmap) graphics were useful for making animated drawings. Vector graphics can be rendered at any resolution, can easily be deformed and resized, colours can be readjusted, etc. They are quite well suited to render the traditional animation style: contours filled with some colours – inherited from the “cell(uloid)” style. Therefore I decided to introduce not only raster layers, but vector layers as well. Yet I wanted vector drawing to have the same artistic feel as raster drawing, so I implemented the same tools for both layers – although some of them such as the pencil and brush behaved differently.This lead to v0.4 released in January 2007. Below is a screenshot:
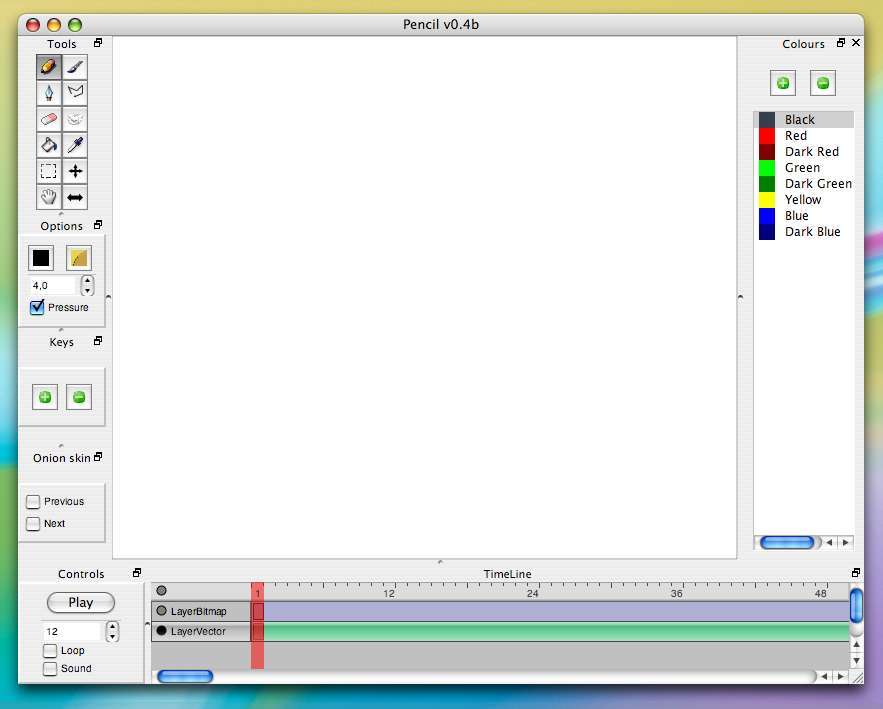
It was a huge jump from the previous versions. A lot of the original software was rewritten at this stage. Although incomplete, buggy, and still very unsatisfactory at many levels as an animation programme, it had the capacity to produce decent animations.
At that time, Patrick told me that he was pleased to follow these developments but did not have the time or capacity to get further involved in them, so he kindly agreed to grant me administration of the project. This was perfect timing as I had already invested a lot of efforts (in particular on the vector side) and started developing a personal vision of what the application should be in its final version. I considered creating a new project with a new name, but failing to find anything better than “Pencil”, I kept the existing sourceforge project. I supplemented it with a newly designed website, a forum, and later and wiki to get more feedback and public attention.
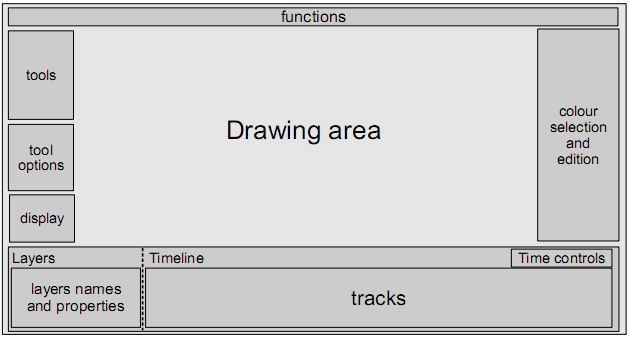
From then, I brought many refinements (some of them being quite unknown such as curved gradients) and got some occasional help from people such as Benjamin Raverdy, and Mark Schmelzenbach, although I remained mostly the only developer. The latest version v0.4.4 to date (released in early 2008) looks like this:
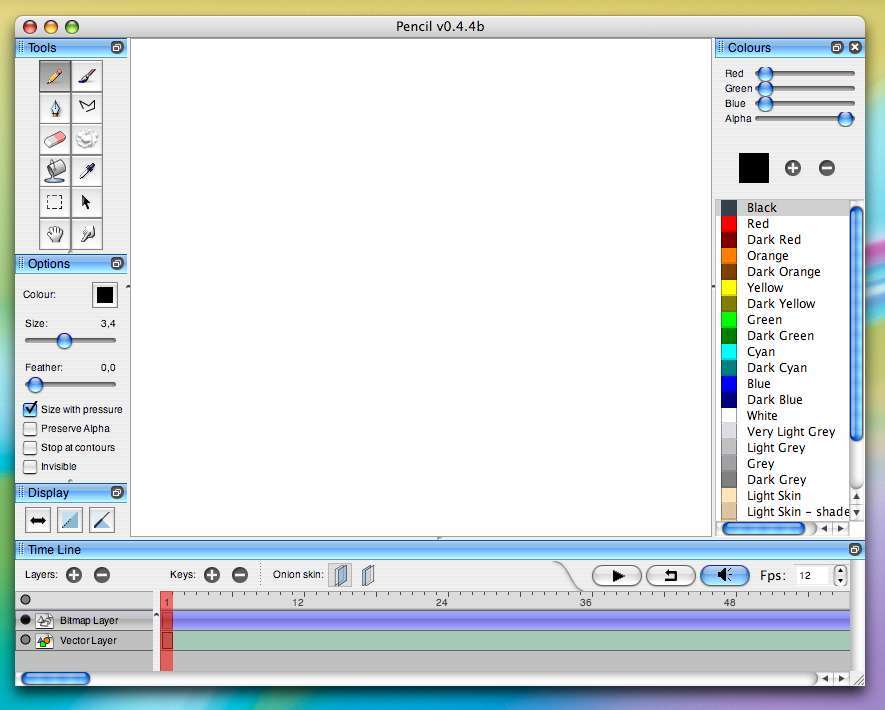
As of May 2010, this version is downloaded about 1000 times a day, according to the Sourceforge statistics.
After this version, I had to make a pause for several reasons. Firstly I could not dedicate as much time to Pencil, and secondly I had long realised that the code had grown organically and inherited many poorly designed elements and architectures which needed some cleaning. So I set myself to this task. Some time has passed. Fortunately, then came along Oluseyi Sonaiya who by and large shares the same vision of Pencil as me, and also decided to take advantage of his experience as a developer to clean and extend Pencil to the next level.
2. The spirit of this project
When I started to publicise Pencil, my intention was to make everyone benefit from my ongoing effort to design an animation application. However, while being an open-source project, I believe that an application like Pencil should be designed with some personal vision and goal to remain effective. I hope other developers will share my vision and join this effort, and that Pencil will become useful for most people interested in animation. As general rules,
- feedback and suggestions are very welcome and will get due consideration
- any kind of contribution is very welcome if it indeed integrates into the vision and concept of the project, and will get consideration for official release
- people interested in making substantial changes inconsistent with or departing from the concept of the project are free to do so, provided they create their own distinct project, or possibly subproject (optional extension, etc).
It does not mean
- that Pencil will necessarily comply to anyone’s needs, habits, desires.
- that the Pencil project is everyone’s, that anyone can do whatever they want with it, claim new version, or dismiss credits of people who contributed to it.
These points, in my opinion, follow common sense and the usual acceptance of the term open-source, consistent with the GPL license of Pencil. (If it is not the case, the license should be updated accordingly).
So far I have developed Pencil mainly by myself and for myself. Now that several people are interested in participating in the project in the long term, it has become necessary to provide some information about my original vision and concept of Pencil. This is the goal of this document. It was kindly suggested to me by Oluseyi.
3. The concept
3.1 Why this project?
As I once wrote on the Pencil website, I have always liked drawing and the art of creating motion from a series of drawings. As a child, I used to make animation by drawing pictures on each page of a notebook. It was fun and simple, but not so convenient and quite limited (compared to a real animation film featuring colours, sound, etc).
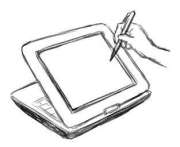
Displaying pictures and playing sound is an ability that computers quickly acquired. As a result, a lot of animation software naturally emerged over time. However the usual input systems (keyboard and mouse) used by computers, along with conventional software design, have kept those programmes remote from the original drawing experience of traditional animation. Fortunately, pen tablets and later tablet PC appeared and made it possible to get an experience much closer to actual drawing. Still I found that existing animation programmes were either
- not taking advantage of the tablet
- not recreating the drawing experience of traditional animation, or not completely satisfactory in their design
- oriented towards other goals than traditional animation
- not available / affordable to the general class of users
So I decided to develop an application which would be simple, available to anyone, and designed to recreate the drawing experience of traditional animation, along with some other benefits coming from using a computer. In a sense, it is an attempt at conciling the traditional pencil approach advocated by people such as Hayao Miyazaki: drawn to perfection and the advantages offered by today’s computers, in particular pen tablets. This is the guiding line of the project.
3.2 What Pencil is not:
- Pencil is not and will never be a clone of some existing software
- Pencil is not and will never be defined as the “free of charge” alternative of some existing commercial software
- While Pencil might get inspiration from existing software, it is not required to follow closely the interface or design of some existing software just because it meets some users’ natural expectation. Original design/paradigm might prevail over previously established ones.
- For practical reasons, and unless some essential function makes it necessary, Pencil in its internal structure will not be bound to comply to some predefined format or protocol, other than those defined by the Qt framework. In particular, Pencil is not a SVG editor or Flash editor, etc. It should be however be able to import and export various useful formats with some reasonable accuracy/compliance to those formats’ specifications.
3.3 What Pencil is:
The primary goal of Pencil is to create traditional animation, which consists in drawing several pictures to create the illusion of motion.
Because of its potential, it also appeared that it may be used in the future for related usages such as
- drawing, painting, editing pictures (without animating)
- drawing storyboards or comic strips
- taking notes/sketches/doodles and organising them
- editing videos.
However, these are not the primary goal of Pencil at present.
Finally, Pencil might be the basis for an integrated solution for animation project management, often referred to as “animation studio”.
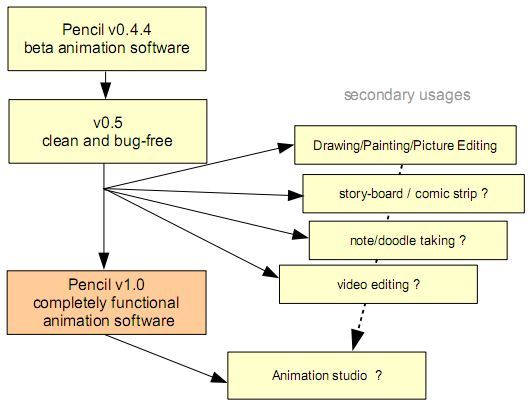
In order to allow the secondary usages, Pencil will be designed in a very modular way from v0.5 and beyond.
3.4 The general interface
3.4.1 Appearance
Visually, Pencil should be dominated by the drawing/viewing area since it is focused on drawing.
Tools, options, and other technical elements should appear around this area in a non-obstrusive way and kept to a minimum. Their graphical representation should also assume a simple (but pleasing) appearance to let the user work with some “peace of mind”.
In that respect, the current Windows version has some unnecessary embossing lines and approximate layout which leaves an uncomfortable impression. The Mac version displays unnecessary boxes around each tool.
The platforms of reference will be pen tablet laptop computers and single-screen desktop/laptop computers, although we might also consider multi-screen usage. To satisfy different users, the interface will be customisable to a large degree, although predefined, thoroughly thought interface environments will be provided by default for each usage and platform.
Ideally, Pencil should be a multidocument application; open documents could be indicated by a series of tabs at the top of the screen.
3.4.2 Multiple usages/environments
The current and only usage of Pencil is creating animations. When (or if) secondary usages become available, it is expected that Pencil will have some option to switch between those environments. It may appear as a menu in Pencil menu bar or as a series of buttons at the top of the screen (easier for tablet users), or even as a splash screen option.
The idea behind the different usage environments is to display (or possibly alter) only the elements which are relevant for a given usage.
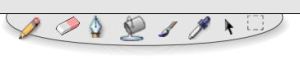
For example, the current interface of Pencil is dedicated to drawing animations. It has the following elements : A layer/timeline palette displaying both layers and their associated tracks, a colour palette, a tool palette, a parameter/option palette, and a display palette. A menu bar (or a function bar with buttons when using a tablet) contains the basic file/edit functions (open, save, import, export, undo, redo) and some more specific functions.
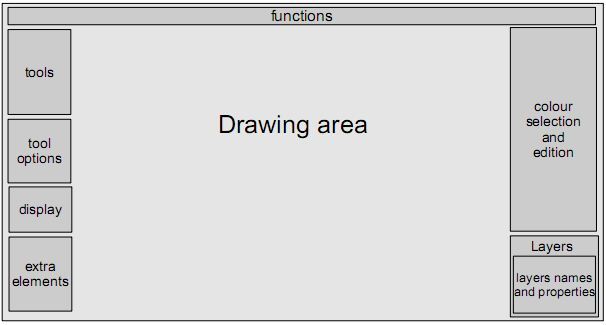
Switching to a purely drawing/picture editing usage will make the timeline irrelevant. However, it will still be necessarily to access layers. The interface would switch to something like this:
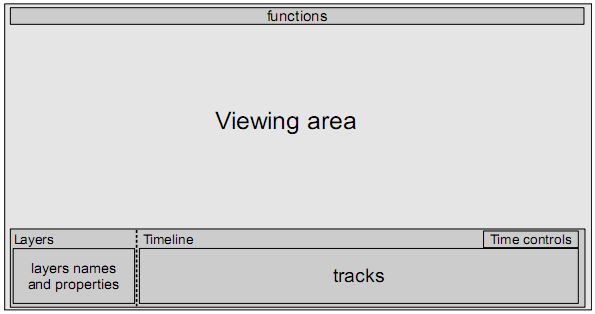
Switching to a purely video editing usage will make the drawing tools irrelevant. The interface would switch to something like this:
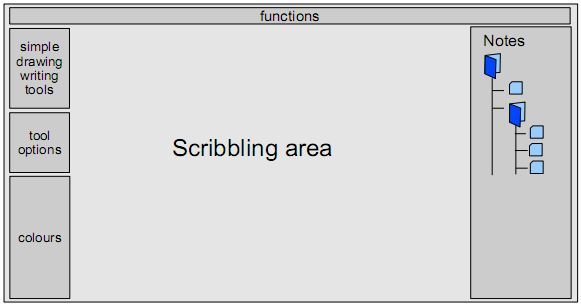
Switching to a note-taking environment might look like this:
This versatility is quite interesting, although it raises many questions.
Obviously the same kind of information cannot always be displayed in different environments (an animation is not quite a note which is not quite a picture). This would call for creating variants of the Pencil format for each usage, which would effectively correspond to having a suite of different applications just like OpenOffice. Another, possibly more fruitful approach is to allow the Pencil document format to have a section for each kind of environment. For example, the same file could contain a section of animation and a section of notes of handwritten ideas, instructions, or sketches which could be copied and pasted in the animation section. Of course, if a file contains only one section, it would open by default in the corresponding environment. In the case of creating a new document or opening a documents with several sections, a splash screen would ask the user which environment to load first.
Can this be done in practice? The danger of this approach is that Pencil become an overweight application. While it might be acceptable to wait several seconds to load a full-featured animation programme, it might be less so in the case of a quick image-editing programme or note-taking application. One possible solution would be a light-weight core that could dynamically load only those modules which are required for a given usage. The effectiveness of this approach should be investigated.
Other practical questions arise about the interface. For example, the onion-layer buttons allow to display/hide previous and next images in semi-transparency, which is a traditional useful trick to draw animation. It may be seen first as a display feature. However, it does not make sense in usages which do not involve time and the notion of previous and next image. In that sense, it should be included in the timeline (which disappears when switching to non-time related usages). On the other hand, it would hardly be useful in, say, video-editing mode. Defining where and when the elements appear obviously requires some thinking.
4. The animating environment
The following describes specifically the animation environment, which is Pencil’s current main goal and prority.
4.1 Drawing
4.1.1 Raster and Vector Layers
Pencil has two drawing modes: raster and vector. Although it is advisable for the user to know the difference between the two, it is essentially a technical difference about how drawings made by the user are encoded and stored in the programme. In most applications, the choice of one of these two technical implementations heavily influences the way the user can input and interact with the drawing. As a result, raster graphics programmes and vector graphics programmes usually have quite different interfaces and tools.
In Pencil, I want to break with this tradition and offer a common interface which is close and to the natural drawing experience. Other conventional tools more specific to raster or vector modes might be added as a special set for more advanced or conservative users.
There are many styles of 2D animations, from the conventional American celluloid style to the Russian sketch/paint style, and Pencil will give some freedom in that respect. Yet the celluloid style is the most common one and will be taken as a reference. We will assume the following steps:
- sketch/pencil/line tests
- draw clean lines and temporary lines
- fill areas with colours
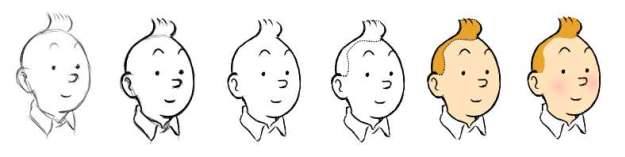
The basic drawing tools should be able to perform these basic tasks. These tasks are in fact quite separate, and it is convenient to perform them in different layers. For example, pencil tests are initial drawings which are later used to draw clean lines, and eventually hidden from the final view.
Temporary lines (dotted lines above) might also be used to define boundaries of colour areas, and then hidden from the final view. In raster mode, for clean results, it is necessary to put colours in a separate layer so that they do not mess up with the line art. These are some of the reasons why Pencil introduced layers.
Layers are like transparent sheets of paper on which one can draw different elements that can be shown or hidden by placing or removing the sheets. For convenience these sheets do not have a definite size, it is possible to draw anywhere, as far as one wishes. Because of their different nature, both raster and vector graphics could have been contained in a single layer, but I decided to create separate kinds of layers for raster and vector graphics.
While it makes sense to have different characters or backgrounds on separate layers, it is also clear that for a given character, line tests, clean lines and colours are just successive steps of a single entity. It might become confusing to have so many layers for each step. I considered two solutions:
- Probably the most generic solution to this problem is the ability to group several layers into a single one, visualised as a single entity (for example, a character) and whose internal layers can be displayed when necessary.
- A second solution is to define within a layer several “sublayers” corresponding to each step, namely: sketch, clean, fill.
The first solution is very generic. It gives a lot of freedom to the user to organise layers the way they want, but I am afraid this solution is not intuitive enough for everyone, and might still be a hassle to deal with (having to create and group layers by hand, select the appropriate layer at the appropriate time many times, etc).
I therefore advocate the second solution which is slightly more preemptive, but will probably simplify the user’s workflow. It is explained in the next section. That being said, the idea of grouping layers should also be implemented in the long run as it is needed for other purposes, namely making different layers behave in a similar way. I will detail this idea in section 4.2.4.
4.1.2 Sublayers
The idea is that for any drawn element (such as a character or part of it), there is a single layer, which contains 4 sublayers:
- sublayer for line tests (sketch)
- sublayer for clean lines (clean)
- sublayer for temporary lines (temp)
- sublayer for colour fills (fill)
In terms of rendering, sublayers are ordered as follow: sketch, fill, temp, clean, with the clean sublayer being the foremost sublayer. (Note: these names are provisional). A GUI element (in the display options or on the drawing canvas) will indicate and let one choose which sublayer one is working on. Selecting one drawing tool will often select the appropriate sublayer. In other words, most drawing tools keep memory of which sublayer they are acting on.
While this can be changed by the user, drawing tools will by default act on the most useful sublayer(s), thus a beginner will not need to pay attention about sublayers at first, and will then learn their meaning as they use the tools. This should also save the user some time.
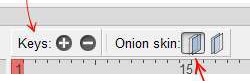
The GUI element may look something like this:
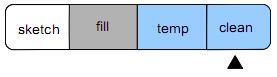
where the triangle indicates which sublayer is active, and the sublayer buttons can be used to show or hide a particular sublayer. In this example, the fill sublayer is empty, the sketch sublayer is hidden, and the temp and clean sublayers are visible. The clean sublayer is active. Hovering the mouse below one of the non-active sublayers will make a grey triangle appear. (This interface is inspired from the channel selection in MidiSwing). Text labels could be replaced by icons if they are suggestive enough.
When a camera layer is active, sketch sublayers of all layers will be hidden automatically unless clean and fill sublayers are empty. This should save time for the user as they do not have to hide and show each sublayers manually.
Note of implementation: in vector mode, the sublayer separation “naturally” exists because all different vector elements are distinct entities. On the contrary, different elements of a raster graphics are parts of the same of pixel matrix and there is no way to distinguish them, apart from storing them in different matrices (raster). The notion of sublayer is implemented differently for raster and vector graphics but should appear essentially the same for end users.
4.1.3 Drawing Tools
The number of basic drawing tools is intentionally limited for simplicity. These tools should behave more or less the same, whether in raster or vector layers. The precise behaviour might not be exactly the same, but it is important that the goal and meaning of the tools are the same. Ideally the vector tools should change as little as possible the input from the user (i.e. a stroke should not change shape just after being drawn), to recreate the sensation of a faithful drawing tool.
Other tools more specific to raster or vector graphics may be available as an advanced mode. Tools often found in other programmes such as geometric figures (rectangles, ellipses, polygons) and text are intentionally absent from the set of basic tools, as they provide little benefit to traditional animation. They may be provided as optional advanced tools (or as basic tools in other usage environments such as drawing and note-taking).
Pencil
The pencil tool is defaulted to the sketch sublayer.
In the sketch and clean sublayers, it operates as a usual pencil. By default, it has constant width and opacity depending on the stylus pressure. Some extra options, such as a slightly shaky appearance due to the simulated graininess of the paper, would be nice (plugins?).
In the temp sublayer, it draws dotted lines which are displayed only when the fill sublayer is active. These lines are used to draw invisible contours of areas to be filled with some colour.
Pen
The pen tool is defaulted to the clean sublayer.
It is used to draw clean lines. By default it has variable width and full opacity with stylus pressure.
Some extra options, such as a slightly shaky appearance due to the simulated graininess of the paper, would be nice (plugins?).
Lines
The line tool is defaulted to the clean sublayer.
It is used to draw either straight lines (when two points are clicked), or curved lines (when more than two points are entered). This is particularly convenient to draw clean lines when a tablet is not available, and only the mouse can be used.
to be continued…